The New Family

I was asked by #1000families to take part in their 1000 blog posts about family. I had to sit with the idea for a while to see where my thoughts on family would take me. Ultimately it took me back in time to losing my father in a plane crash at the age of 3, and the strength that my mother has showed over the years raising 5 girls on her own after his passing.

Excerpt from the post is below....

I was born and raised in Drayton Valley, a small town in Alberta. At the time, the population hovered around 5,000 people and my family; mom, dad, four elder sisters and I made up a small part of that population. We were a traditional family living their life in a small town.

When I was just 3 years old, our lives were turned upside down when my father died in a plane crash at the age of 38. Little did I know that this event would change my interpretation of the word ‘family’ before I even understood it’s true meaning and that throughout my life the size and shape of my family would change more than just the once. This entity that I had taken for granted would never be the same again.

To read the full post, click here.

Ontario Raspberry Cheesecake

ontario raspberry cheesecake

While I love to bake, I prefer to cook. So when I have friends coming over for dinner I generally exert the majority of my effort on the main part of the meal and choose recipes for dessert based on their easiness to deliciousness ratio. 

I have had this recipe in my arsenal for almost 20 years and while it is simple, it still manages to taste delicious and be a crowd pleaser. The original recipe calls for Oreo Cookie Pie Shells but fear not, if you can not find them pre-made you can always pick up the bread crumbs and follow the directions on the back for the crust.

oreo cookie crust

Ontario Raspberry Cheesecake

Ingredients

2 Oreo Cookie Pie Shells

1 egg, separated

1 cup whipping cream

8 oz soft cream cheese

2/3 cup icing sugar

2/3 cup concentrated Ontario raspberry juice. (I used 3 cups Ontario raspberries I froze after picking them in the summer)

1 tsp lemon juice

Assemble all ingredients before beginning.

In a small saucepan over low heat slowly warm 3 cups of frozen raspberries until mashed and slightly liquidy. Using a fine mesh sieve, place approximately 1.5 cups in the sieve and squeeze out 2/3 cups of concentrated raspberry juice and set aside. Keep remaining 1.5 cups of softened raspberries in pot for later use.

whipped egg white

In a small bowl, beat the egg white until stiff and then set aside. In a separate bowl beat 1 cup of whipping cream and set aside.

In a medium sized bowl, beat the soft cream cheese and gradually add in the icing sugar until smooth. Once fully incorporated, beat in the egg yolk, the raspberry juice and the lemon juice.

Fold whipped cream into the cheese mixture, then fold in egg whites. Once fully mixed, pour mixture into pie crusts and freeze until firm (approximately 3-4 hours).

Just before serving, warm up remaining crushed raspberries, adding 1/4 cup of sugar and 3 tbsp maple syrup and warm. Pour over slices of cheesecake and serve.

Bummed out Banana Bread

banana bread recipe

It's been a tough start to 2016 and today I am having a hard time feeling motivated to do much of anything on my to do list. And my to do list is long. Thankfully my husband is a wonderful man and while I retreat from life for a little time to build myself back up, he has revved things up on his end and is carrying the both of us.

I got back a week ago today from Calgary. I was out there for just under 2 weeks. I went out, because Mamacita Manning (my mom) is undergoing chemotherapy. In total she will have 6 rounds and between me, my 4 sisters, my aunt and my uncle - we are each taking turns to be there for her for each of her treatments. For seven days I took her to the hospital. On each day, she received 3 injections in her abdomen. Each day her stomach would get a little bit sorer and she would lose a little more of her appetite and her strength.

I flew back to Toronto last Wednesday and just haven't been myself since I got back. I feel a little like I left a part of myself with her...which perhaps is a good thing, because she needs it. But it makes it hard to face my days here.

On top of all of this, I have been diagnosed with frozen shoulder. Certainly not as serious as cancer, but I have to be honest - I would not wish frozen shoulder on anyone. It is not very treatable, yet it is strangely and chronically painful. Makes sleeping difficult and doing my job, which consists of lifting heavy boxes of produce, making jam, lifting heavy jars, setting up farmers market tents, etc rather painful and difficult.

So, I think it would be fair to assume that I am feeling a little bit sorry for myself. So seems like the perfect time to make some Banana Bread. My Auntie Dena shared this recipe with me several years ago. I have adapted it slightly over the years and what I share with you today is the adapted version.

Bummed Out Banana Bread

Ingredients

1 cup unsalted butter

2 cups granulated sugar

4 eggs (room temperature)

2 tsp vanilla

2 tsp lemon juice

2 tsp grated orange rind

3.5 cups flour

1 tsp salt

2 tsp baking powder

2 tsp baking soda

5 ripe bananas (mashed)

1 cup sour cream

1 cup chopped pecans

Cream together butter and sugar, add eggs, vanilla, lemon juice and orange zest and mix thoroughly.

In a separate bowl combine flour, salt, baking powder and baking soda. In a third bowl combine the mashed bananas and the sour cream. Then combine the flour mixture and the butter mixture together. Do this slowly combining ingredients thoroughly. Stir in banana mixture and finally the pecans.

Pour into 2 greased and floured loaf pans and bake at 350 for 1.5 hours or until a toothpick inserted in the middle comes out clean.

Then allow it to rest, cut yourself a big fat slice, toast it and smother it with marmalade and all of a sudden your frozen shoulder is temporarily forgotten because your taste buds are singing too loudly.

How to choose the right marmalade recipe for you?

There are seemingly countless ways to prepare seville orange marmalade and with the right group of people, this topic could lead to a rather long and heated debate. Some of it comes down to personal preference - do you like a fine, medium or chunky peel, would you prefer a low sugar jam if it means compromising the perfect set? But some of it also comes down to science and what constitutes a perfect marmalade.

Here are some things to consider when looking for the perfect marmalade recipe for you.

1) Choosing your Seville Oranges

If you are lucky enough to live in an area where you can actually choose your Seville Oranges, consider yourself lucky ;). In previous years, I have been lucky enough to get my hands on organic sevilles and have noticed a couple of difference when using them to make marmalade. So if you are wondering if there are benefits to going organic over and above health benefits - there are! They definitely have better flavour and they set more quickly than non-organic. Overall leading to a higher quality marmalade.

The fresher they are when you make your marmalade the better. Over ripe fruit tend to lose some of their pectin so you will have to cook your marmalade down too far in order to achieve set if your oranges are old.

And you may not know this but Sevilles come in several sizes if you are buying them in bulk, this is a good thing to know. In Canada you can get 88, 72 or 56's. The smallest are the 88's and the largest the 56's. If you are following a recipe it is always a good idea to use one that goes by weight and not number of oranges as this can lead to varying results.

shredding peel

2) Preparing your peel

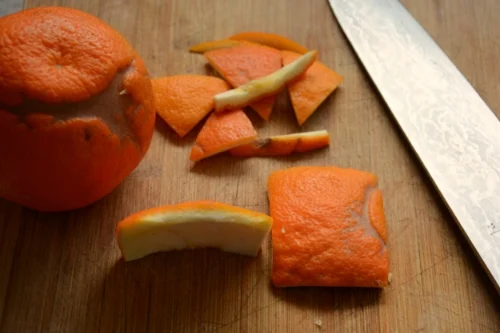
There are so many different ways to prepare your peel and this is truly where personal taste comes into play. If you prefer a less bitter marmalade you can peel the skin off like would would an apple, getting as little of the pith as possible and shred it super fine or you can leave it nice and chunky. Just keep in mind the chunkier the peel, the darker your marmalade will end up as it will take longer to soften it. If you find a recipe you like the sounds of but want to alter how you prepare your peel, just keep in mind it may affect how long you need to cook it in order to soften the peel.

marmalade soaking peels

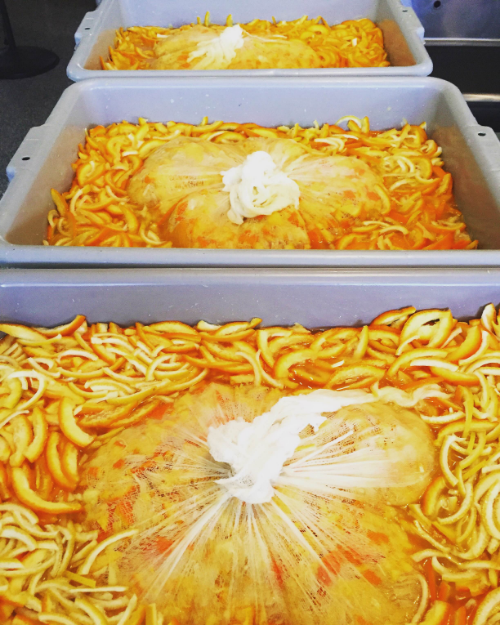
3) Soaking the peels overnight

Recipes vary and you will find as you comb through them, that some suggest you prepare your peels one day, soak them overnight and cook the marmalade on Day 2, while others have you do it all in one day. How do you know which is the better option?

For me it is a simple answer. If you are looking to enter your marmalade into competitions you always want to follow the 2 day process. You will end up with a brighter marmalade that is more appealing from an appearance perspective for the judges. I also find, that when you split the tasks over 2 days it is a lighter workload on each day.

But if you are pressed for time and you only have the one day available in your calendar to make marmalade, don't worry about it. You will still end up with a lovely tasting marmalade if you do it all in one day.

preserving pans

4) Open pan vs lidded pan  

Yes, recipes will vary on what type of pan you should be making your marmalade in. Some swear by the preserving pan, which is generally not lidded, has outwardly tapered edges and is quite often made of copper. While others will swear by using a pot with a lid.

Why the difference in opinions and which route should you go? I have made marmalade both ways. With the open pan, (especially if it is copper just remember to not use it until you have added sugar to the mixture. Use a different pot to soften the peels) you will notice a high bitter note to your marmalade. You may also notice that the liquid in your marmalade evaporates more quickly and you end up with a higher concentration of peel to liquid ratio when jarring. With the open pan method your peels also may lean towards a chewier consistency.

The lidded pan obviously contains the evaporation which means it will not reduce as quickly. You will have a less bitter flavour and a lower ratio of peel to liquid when jarring.

5) How much sugar should the recipe have?

There are wide swings in the amount of sugar stated in recipes that I have tried over the years. If you want a marmalade lower in sugar you will have to keep in mind that your marmalade will not achieve a proper set and will be softer in consistency. It will also have a shorter shelf life which means it most likely will not last you til next marmalade season. 

6) Testing for set

I am not going to go into the details of how each of these tests are performed in this post. I am just going to give my opinions on which method I think works best when making marmalade. You can use the plate test, a thermometer r

Personally, I prefer the spoon test. This gives me the closest relationship with the marmalade. This may sound strange, but I think this is important. When I can see the consistency of the marmalade beginning to change and I think I am getting close to set, I dip my spoon in every 5 minutes or so and check on how the drops are falling off the spoon. I find this visual way of checking gives me the ability to achieve the set I prefer.

Trusted marmalade recipes I have used in the past with great success:

Lower sugar - Nigel Slater shares his marmalade recipe which is lower on the sugar side which leads to the softer set and shorter shelf life I mentioned earlier

Smaller batch - Vivien Lloyd shares her small batch marmalade recipe. This recipe leaves you with a bright marmalade with a perfect set

One day marmalade - Canadian Living provides a recipe for those that want to get it all done in one day

Marmalade, glorious marmalade!

Shredded Seville Orange Peel

Shredded Seville Orange Peel

I am admittedly a bit of a marmalade lover. And while, I love meyer lemons, blood oranges and the like, my one true love is the Seville Orange. I can get well and truly absorbed by the process of making marmalade. It is not something one does quickly. There is a process, a cadence to making a truly wonderful marmalade and I get excited in January as marmalade season approaches. I sharpen my knives, get my cheese cloth ready and sit and wait til I hear from my suppliers that Sevilles have arrived. 

And then me and my team all get into the marmalade rhythm. We embrace the blisters one gets from hand shredding the peel and we bask in the citrus smell coming from the kettles as it takes it's time to simmer down to perfection.

Seville Oranges have ARRIVED. I have seen them on the shelves is stores across the city ranging in price from $2.49/lb to $2.99/lb up from last years price of $1.99/lb. If you want to make lots of marmalade consider asking the produce manager at your local store to bring it in by the case. The lovely produce manager at my local Coppa's is more than happy to do it. Currently a case is $75/box.

Here are some wonderful marmalade recipes (not all made with Seville's in case you don't share my love) to get you started.

Lime Cilantro Marmalade - this recipe was created for an entry into Mad for Marmalade. It ended up winning a 2nd place ribbon. I love this marmalade with fish tacos. It has a nice bright citrus flavour that compliments fish very well. P.S. I am judging the competition this year, so if you come be sure to say hi!

Seville Orange Marmalade - If Christine Ferber is the 'Queen of Jam', then the title of 'Queen of Marmalade' goes to Vivien Lloyd. She is passionate about marmalade and shares my same adoration for the Seville as I do. This is a great recipe which gives you a clear, beautiful marmalade flavour as a result

Blood Orange and Vanilla Marmalade - If you missed it Amy launched a preserving cookbook earlier this year called The Canning Kitchen. It focuses on simple and small batch.

Understanding preserving recipes for the best results

preserving recipes

Have you ever decided that you are going to try a new preserving recipe and even after you follow the instructions closely, when you open that jar to test the results you find a runny jelly or a rock hard jam? It's disappointing - no two ways about it. Not only did you spend money on the ingredients but you took the time to set everything up and the results are less than perfect.

There are parts of a recipe that you need to pay close attention to and if you are new to preserving, you might now know it. Here are a few things you should pay close attention to in a recipe for consistent and delicious results.

Non-Reactive Pot or Pan - A lot of recipes start off by telling you the size of pan or pot you require and it will sometimes state non-reactive. It is important to use the size of pan asked for in the recipe because this determines how quickly the contents will come to a boil and how much of the liquid will evaporate. Both of these things are important if you want to achieve the desired 'set'.

Non-reactive is important because the natural acids in the fruits and vinegars used in preserving can react chemically with aluminum or galvanized metals and have dangerous results.

Stirring constantly, versus stirring frequently or regularly - Preserving recipes will often state that the jam should be stirred constantly, frequently or regularly. When it says to stir constantly, if you fail to do this your jam or jelly can come up to a full boil too quickly and not enough of the liquid will have evaporated. This will lead to a jam with a very loose set or a jelly that does not set at all. 

Powdered versus liquid pectin - these are not interchangeable. If a recipe calls for powdered pectin do not substitute it for liquid. Powdered pectin goes into a recipe right at the start and liquid closer to the end. They each react differently with the ingredients and substituting one for the other will lead to undesired results. It's also always good practice to check the expiry date on your pectin before using it.

A rolling boil - when a recipe tell you to bring something up to a rolling boil, remain patient and don't stop until you have achieved this boil. A rolling boil has been achieved when you stir the jam/jelly and the boiling does not stop. This is to ensure you are getting the product up to the temperature required to achieve set. If you stop before it achieves the rolling boil you are going to have inadequate temperatures for set.

Most recipes also ask that you maintain the finishing rolling boil for 1 minute. This is the appropriate amount of time for the pectin to begin to work. Boiling for less time may leave you with a soft set and over boiling can lead to a very hard set.

Skim off foam - You always want to skim off any foam that might appear on the surface of your jam or jelly. This foam is just trapped oxygen being released from the fruit and if you stir it back into the product, you are simply stirring oxygen into an environment where our goal is to be oxygen free. It's a simple step and it will increase the shelf life of your jam.

Headspace - Why do you have to leave a 1/4" headspace? If you leave more headspace, the contents of the jar may not expand enough to push any trapped oxygen out of the jar and you will have jars that do not properly seal. If you leave to little headspace, the contents may expand so much that they expand right out of the jar and into the water bath itself. This may lead to jars not properly sealing as well.

Hopefully these few pointers will help you achieve a perfect jam the next time you try out a new recipe.

Pressure Canning Grapefruit Curd

Whether we want to admit it or not, we are approaching the upcoming holiday season at warp speed. Today is December 1st which means in a blink of an eye Christmas trees will be going up in houses all around you, mall parking lots will be full at the crack of dawn til the end of the day and carols will play on the radio 24/7.

Love it or hate it, Christmas is coming!

And with the approaching holiday season, comes the fact that friends and family will be popping over for visits, bites to eat and festive drinks.

While I love to cook, I also love having some of the food prepared ahead of time. And what better way to be prepared than to have pre-made dessert just sitting in your pantry awaiting the arrival of planned or surprise guests.

Pressure Canned Grapefruit Curd

Ingredients

1 2/3 cups superfine sugar*

1/3 cup fresh grapefruit zest (generally takes 4-5 grapefruit. You want zest and not pith)

4 large eggs

8 large egg yolks

1 cup grapefruit juice (freshly squeezed and strained)

2/3 cup of chilled unsalted butter cubed

In a small bowl, combine the superfine sugar and zest (if you do not have superfine sugar, run granulated sugar through a mixer to reduce the size of the granules), stirring until well blended. Let stand for 30-45 minutes to allow the sugar to pick up the citrus flavor of the zest.

Fill the a medium saucepan about ¼ full of water. Over med-high heat bring the water to a gentle boil.

Meanwhile, in a medium metal bowl, gently beat the whole eggs and egg yolks. Gradually whisking in the sugar and the zest until well blended. Stir in the grapefruit juice and then add the butter.

Place a medium sized glass or metal bowl in the fridge to cool.

Place bowl over the pan of boiling water. Make sure the top pan sits well above the water so the curd will be cooked by the steam only, not the boiling water. Reduce the heat to keep the water from boiling too vigorously.

Slowly heat the mixture, stirring constantly with a flexible spoon or spatula. Stir gently or the curd will be filled with tiny air bubbles. Scrape the bottom of the pan frequently to prevent scorching or curdling. Cook the mixture until it reaches a temperature between 168F and 170F (76C and 77C) about 5-7 minutes.

Remove the top pan or bowl from the double boiler and place it on a dish towel. Continue to stir the mixture until the curd thickens and coats the back of a metal spoon, about 5 minutes.

Remove the chilled bowl from the fridge. Place a fine meshed sieve over the bowl. Slowly pour the curd through the sieve and into the chilled bowl to strain the zest and any small lumps from the curd. Gently stir the curd to remove any trapped air bubbles. Don't be surprised if this part takes you between 5-10 minutes. If you want a nice, smooth and creamy curd it is well worth the time it takes.

Ladle the curd into hot jars, leaving 1/4” head space. Using a plastic knife, remove any trapped air bubbles. Wipe the jar rims and threads with a clean, damp cloth. Cover with hot lids and apply screw rings.

Process 125 and 250ml jars for 10 minutes at 10 pounds of pressure in a weighted gauge pressure canner or 10 minutes at 11 pounds pressure in a dial gauge pressure canner. Yields 6-7 125ml jars.


Perfect Pickled Jalapeño Peppers

pickled jalapeno

A couple of weeks ago I headed south over the border with my mom to visit my Uncle in Lewiston, NY. How could I possibly begin to describe my Uncle Louie so you can appreciate the kind of person that he is?

Well to start, his nickname for me is 'the brat'. He has called me that for as long as I can remember. Now you might think that one would find this kind of nickname insulting. But when you hear him say it with his Italian accent, his godfather voice and with the cheeky glint in his eye, you would know that he says it only in love. And like me, you would grow to love the nickname. 

He is an extremely talented man who could build almost anything; from his own house to the most beautiful doll houses for his grandchildren to a stunning birdhouse made of cararra marble. He has endless patience and is a meticulous man - as could be witnessed by the fact that he hand painted all of his tools the same colour blue and each and every tool has a particular spot just for it or by the fact that his tomato plants grow with absolute precision. He pinches them, ties them and trains them to grow in straight lines full of fruit.

Louie's workshop

While we were visiting he brought out a jar of Pickled jalapeño that his neighbour had made for him. He exclaimed about the simplicity of the pickle and how he could sit and eat them straight out of the jar. It reminded me that a couple of years ago I had made jar after jar of a very similar pickle and that my pantry was currently devoid of them. Time to get my pickle jalapeño ON!

Perfect Pickled Jalapeño Peppers

Ingredients

4 cups chopped Jalapeño Peppers

2 cups red wine vinegar

2 cups water

2 tbsp pickling salt

Combine vinegar, water and salt in a non-reactive pot and bring to a boil, add pepper rings and stir to submerge. As soon as the brine and peppers return to a boil, remove the pan from the heat.

Funnel peppers into your previously sterilized jars, top off with brine. Burp your jars to remove any trapped air bubbles and measure your headspace to 1/2 inch.

Wipe rims, apply lids and process jars in a boiling water bath for 10 minutes. Do not start timing until the water is at a boil.

It is best to let these age for at least 2-4 weeks in the jar before opening to enjoy and eat out of the jar as my Uncle Louie does!

IMG_0325.JPG

How to avoid soggy pickles

My mother does not have a green thumb. Even she would admit it. I still remember vividly the first plant that I ever received as a gift when I was still a child and how she mercilessly overwatered it and then underwatered it and how with each passing day it wilted and shrunk until there was nothing left to do but to throw it out.

Over the years, I have watched her murder many plants. She doesn’t do it on purpose as I know she loves them…she simply doesn’t have the touch. This is not a criticism of my mother as she is one of the most talented women I know. She makes amazingly beautiful quilts, crochets tablecloths and bed spreads with some of the most complex patterns and she can cook a meal that will make your mouth water just in the memory of how good it tasted.  But gardening is not one of her skills.

So it will be no surprise when I tell you that I grew up having no personal experience or understanding of how, let’s say tomatoes or cucumbers grew. My aunt and my nona had an amazing garden. And I would spend my summers walking up and down the rows gorging on the fresh sweet peas and raspberries but not really contemplating how these plants produced their bounty.

Now with a garden of my own, which at times can be more weeds than vegetables due to my rather hectic life running two businesses, I have had what I consider the honour to learn more about where our food comes from and just how hard the people who grow it work to bring it to our tables.

When I first read the phrase ‘cut off the blossom end’ in a recipe for Dilly Pickles I had no context for what that could possibly mean. Now, if I were to read that phrase again for the first time having had the experience of growing cucumbers in my garden it would immediately make sense.

But for those of you who grew up in a city, with a plant murdering mother or just no where near where food grows, this is for you ;).

It all starts with the seed, which I get from my friend Laura at Cubits. I love supporting other local small businesses and on top of that, have always had a great success rate with her seeds. Once the plant begins to grow, it produces these lovely yellow flowers.

Cucumber flower

Cucumber flower

You will notice at the base of the flower a itty bitty cucumber will begin to grow pushing the flower further from the stem. These cucumbers are spiny and seem to have little thorns all over them.

Baby Cucumber begins to grow

Baby Cucumber begins to grow

With time, the flower drops off the end and the cucumber continues to grow. As it grows it becomes less thorny.

pickling cucumber

Now here is where we get to the part about how to avoid those soggy pickles that no one loves to eat. I hope that by showing you how a cucumber grows that it is more obvious which end is the blossom end. It is the end furthest from the stem that started out as that lovely yellow flower. But what does it look like?

Blossom end

Blossom end

The blossom end of the cucumber has a smaller circle in general than the stem end and can be slightly rough at the end. 

stem end

stem end

You can generally envision where the stem once attached to the cucumber when you look at it. There is the slight indent from where it was once attached to the plant.

So why do we need to cut off the blossom end if we want our pickles to stay nice and crunchy. Strangely enough, there are enzymes contained in the blossom end that can cause softening of the vegetable once pickled. General rule of thumb is to cut off 1/16" from the blossom end.

Some people also like to use distilled water to help their cucumbers stay nice and crunchy. And don't forget the fresher your cuc is the crisper it will be once pickled.

How to choose the perfect peach

I was recently asked to write an article for Edible Toronto on a seasonal fruit of my choice. With peaches about to burst into full flavour, they were the hands down winner.

peaches

There are many different ways to preserve peaches, three types of peaches to choose from—freestone, semi-freestone, and clingstone—and numerous varieties within each type.

All are delicious, but when it comes to preserving you will want to keep your eyes open for freestone peaches, the flesh of which separates easily from the pit making it simpler to preserve whole or even in pieces. And if you quickly blanch your peaches in hot water and then plunge them into ice water, the skin of a nice ripe peach will fall away easily in large pieces, making your work that much easier.

I often get asked how to determine when a peach is ready to get made into jam or to be preserved in general. There are a couple of things to keep in mind as well as look out for, and some are more obvious than others.

For me, I always start with smell. Don’t be afraid to pick up a fruit at a market or a store and give it the good old-fashioned sniff test. With most peaches, it should smell just like that first bite into the perfect peach tastes—sweet and delicious. If there is no obvious peach aroma, then there is a high probability that there will be no strong peachy taste. 

Keep in mind that this is not true for all varieties of peaches, so be sure to ask questions if you are ever in doubt.

Pay additional attention to the skin and weight of the peach. A nice, ripe peach should feel surprisingly heavy and dense for its size. (Mealy peaches tend to feel lighter in weight.) If the skin is wrinkled or puckered, put that peach right back down because it means it is dehydrated. If the peach is hard, that means it is unripe, but the great thing about peaches is that they will continue to ripen nicely off the tree. Just be sure to lay them out separately and not pile them up in a bowl where their weight could cause those on the bottom to bruise.

I always say that what goes into the jar comes out of the jar, meaning that you want to put the best possible quality of fruit into your preserves. Pass over peaches that are overly bruised or flattened. And if you end up with a peach with a mealy consistency it simply means that it was most likely picked when it was very green and then refrigerated for transport.

To read the full article and to check out some other amazing stories, click here for the online version.