Tips for award winning marmalade

canning competition

With the deadline for the The World's Original Marmalade Awards right around the corner and with Seville Oranges currently in season (I just saw them being sold for $1.99/lb), I thought it would be a good time to share some of the things I have learned over the years having entered my jams, jellies and marmalades into several different competitions.

Let's start off with the judging criteria. How exactly will your marmalade be judged? Now each competition may vary slightly, but they all have similar themes.

The Royal Winter Fair - Your preserves will be judged based on the following criteria:

Visual appeal

  • do you have the correct headspace
  • clarity - they are looking for a clear jelly, a bright coloured jam, a solid amount of fruit
  • suspension - is your peel/fruit distributed equally throughout the jar

Aroma

  • can they smell the different ingredients in your product
  • is it a nice clean smell
  • are there any off notes

Texture

  • have you achieved the desire set
  • is your peel too hard or is it chewy but soft
  • is it spreadable (think of Goldie Locks and the 3 bears here - they want spreadable but not too firm. Soft but not runny)

Flavour

  • is the first thing they taste the fruit used to make the marmalade, jam or jelly
  • is it a clean taste or has it been muddied by overcooking
  • too sweet, too bitter, etc

Originality

  • are you showing them a combination they haven't seen before

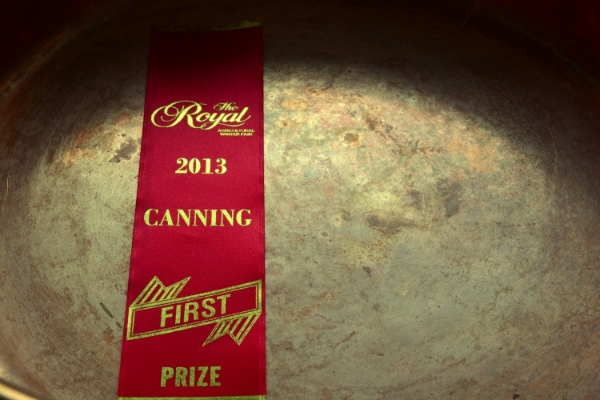
Each category is marked out of 10 for a total score of 50.

Now for The World's Original Marmalade Awards, the criteria is slightly different. They judge the following broken down like this;

  • Appearance (2 points)
  • Colour (5 points)
  • Consistency, texture, quality (6 points)
  • Flavour, aroma (7 points)

To get a gold you need a score of between 19.5 - 20. Silver 18-19, Bronze 16-17.5 and Merit 12-15.

So now that you know what you are going to be judged on, how do you go about creating a marmalade that stands a chance of winning? 

seville.jpg

Marmalades can be made from a variety of citrus fruits; grapefruit, lemons, meyer lemons, blood oranges, limes, etc. But for this particular example we are going to assume that you are making a traditional marmalade made from Seville Oranges. Seville Oranges have a short season and usually arrive in Canada in January or February and can be found in stores for approximately 3-4 weeks. They make a great marmalade because of their high pectin content and their peel has a very interesting bitter flavour. 

  1. Start with using organic seville oranges if possible. Because you are including the peel as well as the meat of the fruit, it does make a difference to the overall flavour when the peel has not come into contact with pesticides. Scrub each orange gently with a vegetable brush and then dry completely.
  2. Prepare your oranges carefully. Marmalade is not a quick jam. So give it the time it deserves and you will be rewarded.
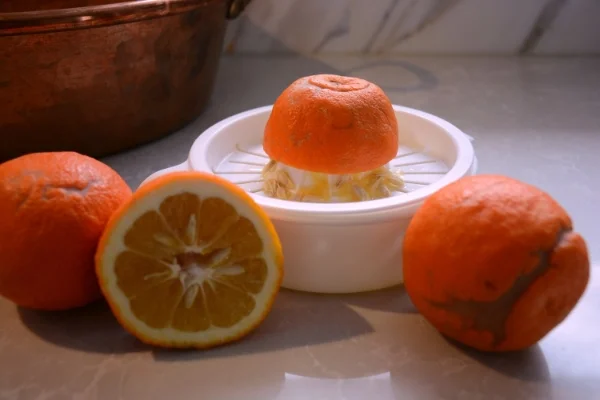
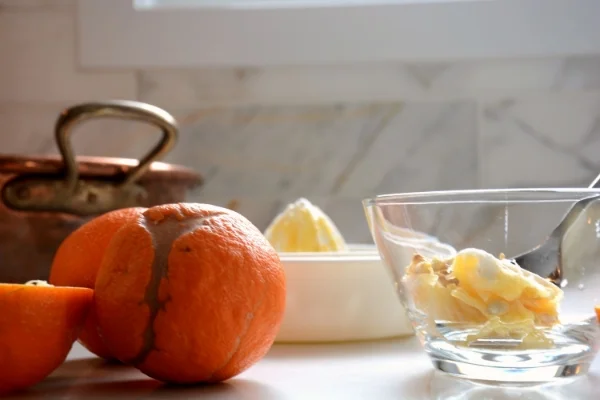
  • Cut your oranges in half and juice. Collect all the seeds so you can put them in the cheese cloth along with the pith and membrane. You may also want to consider supreming your orange segments and cutting it into small pieces.
seville oranges
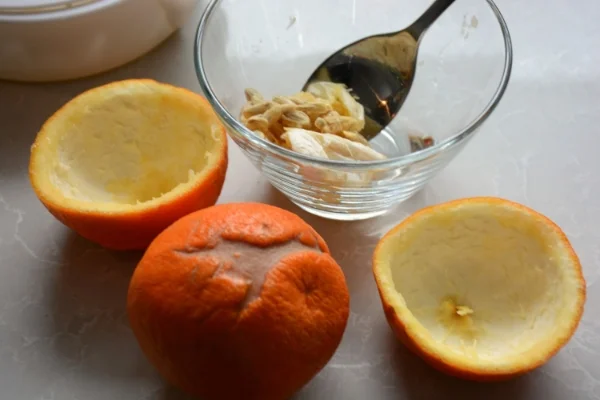
  • Using a spoon, scoop out the membrane and place in a bowl with the seeds. Be consistent with the amount of pith you scoop out for a nice uniform peel
seville oranges
old fashioned seville orange marmalade
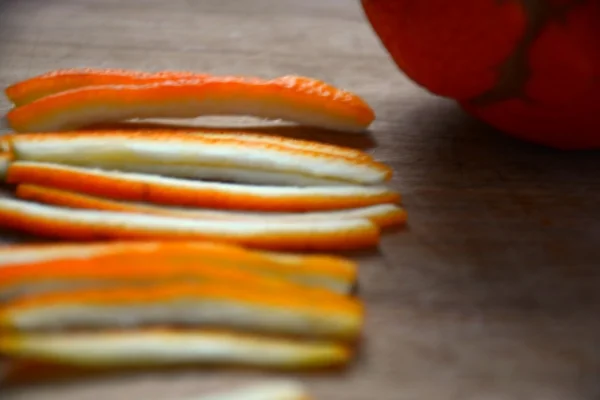
  • Cut your peels in half and flatten, then trim off any points or curves so you can create a nice uniform rind size.
seville orange peel preparation
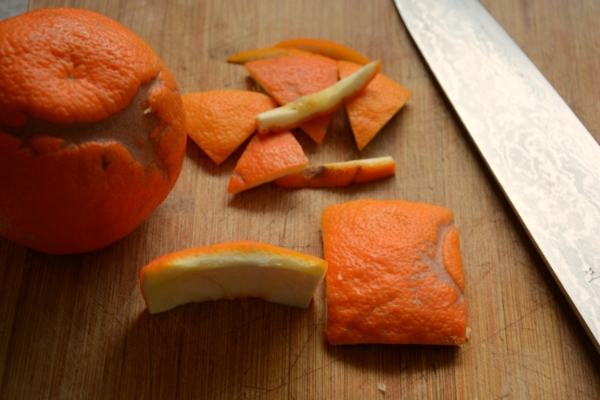
  • you can decide here if you want a chunky peel or a fine cut peel, but ensure you are consistent
marmalade rind prep

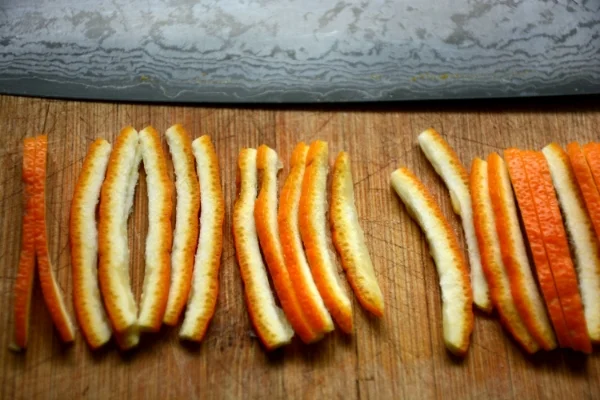
3. Soak your peel in an equal amount of water for 1-2 minutes. This removes some of the bitterness from the peel. Drain the water and do not keep it.

4. Cook your peel with a little bit of baking soda. This will help keep your peel nice and bright once it is cooked. Remember to simmer gently. Peels that are cooked on a high boil tend to get tough.

5. Warm your sugar in the oven before adding it to your fruit. This reduces the chance of crystallization of the sugar in your marmalade. It helps it to dissolve quickly. If you can't warm it in an oven, be sure to allow the sugar to completely dissolve before bringing to a boil

6. Consider making your marmalade in a copper pot (keeping in mind not to soften the peel in the copper pot on it's own. Copper pots require sugar to always be present). Copper is an amazing conductor of heat and allow you to cook your jam down to the desired consistency quicker and without cooking away too much of the flavour of the fruit.

7. Add a small amount of unsalted butter to your marmalade. This reduces the amount of foam as it cooks and reduces the amount of skimming your final product will require. Not properly skimming off the foam can lead to a cloudy marmalade.

8. Allow your marmalade to cool for at least 5 minutes in the pot and off the heat before ladling into previously sterilized jars. This helps to reduce the fruit floating to the top of the jars and leads to nicer suspension.

9. Accurately measure your headspace. Especially in North American competitions, this will be noted and you will lose points if you leave too much or too little headspace.

10. If a jar doesn't seal properly it doesn't matter how delicious your marmalade may be, your entry will still be disqualified.

Now if you are feeling inspired, you still have time to make some marmalade and enter it into The World's Original Marmalade Awards or if you live in Toronto, consider Mad For Marmalade, Crazy for Citrus. 

For a few other pointers you can check out my Marmalade video here

GOOD LUCK!

5 ingredient gnocchi

gnocchi

For years I have been deluding myself into believing that the gnocchi I was buying in the packages from the grocery store were actually 'pretty good'. You see, I grew up with a Nona and a mother who always made their own gnocchi from scratch. They were always light and fluffy and seemed to melt in your mouth. But when I moved out to Toronto to go to University and started down the path to cooking for myself, I always thought it was simply too much work. Making the sauce from scratch was easy enough, but the gnocchi felt like a daunting task and one that was doomed for failure

So when my mom came to spend Christmas with us this year, I decided the time had come for us to make it together so that I could say good bye to store bought gnocchi once and for all. Making it with her, I was amazed at how much simpler it was than I remembered and amazed at how I had ever managed to convince myself that those dense little balls that come out of the package were 'pretty good'. 

Our gnocchi turned out amazing, beyond amazing actually.  And from the number of times that all of us, including the friends we invited over to enjoy this meal with us returned to the pot for 'just a little bit more', I think this rating was shared by all.

Now like all good Italian recipes, some of the quantities below are suggestions and as my mother says when I ask, "How do you know if you will need the full 6 cups of flour?", she replies "You can tell by the touch."

Five Ingredient Gnocchi

6-8 large potatoes

6 cups flour (approximately)

2 tbsp kosher salt

2 eggs

2 tbsp milk

gnocchi potatoes
gnocchi_eggs.jpg

Directions

Gently wash and scrub your potatoes and place in a large pot and cover with water. Bring water to a boil over high heat and boil potatoes until you can poke them with a fork and the fork travels smoothly through the potato.

gnocchi_potato boil.jpg

Drain the potatoes and allow to cool slightly (enough that you can handle them without burning your fingers) but not completely. At this point the skin should peel off the potatoes smoothly. Discard the peel. Place the potatoes in a bowl and add the 2 tbsp of milk and mash. If your potatoes feel runny or watery, place them in the oven on a low temperature for 10-15 minutes to dry them out a little bit. This step will help you eliminate some of the flour you will need to use and you will end up with a fluffier gnocchi.

Our potatoes were perfect, so we did not have to do this step.

To get a nice, light and fluffy gnocchi you really need to put them through a potato press to get rid of any clumps.

potato press
gnocchi_potatomashbowl.jpg

Once all of the potatoes have been pressed, stir in the salt, eggs and a couple of cups flour and mix together. This is where you need to start to go by feel. Once you have completely mixed in those first few cups of flour, you pick up a small amount of the mix and roll it gently in your hands. If it rolls smoothly and without any of the potato mixture sticking to your hands you know you have the right consistency. If this does not happen, add another cup of flour and mix thoroughly and try rolling it in your hands again. 

Once you have reached the desired consistency (we only ended up using 4 cups of flour) you will want to transfer to a larger work station. We covered my dining room table with a large cloth so we could start rolling and forking the gnocchi.

gnocchi ready to roll

Sprinkle a little flour onto your cutting board and cut off a small amount of the gnocchi mixture and roll it out onto your cutting board until it is about the thickness of your pointing finger and start to cut it into small pieces

gnocchi ready to cut

Now while my mom did all the work that requires skill and finesse, I had the easy job of taking the little pieces she was cutting up and rolling them gently off a flour covered fork onto the cloth we had covered the table with. Sprinkle flour over the gnocchi and cover with another cloth until it is time to cook them.

gnocchi rolled with fork

This part took my mom and I the better part of an hour, which is what I think made the process feel daunting in my mind. But it was actually quite lovely. We talked and laughed and the work made us look forward to the meal we were about to have once all the work was done.

gnocchi_overheadshot.jpg

To cook the gnocchi bring a large pot of water to a boil and drop the gnocchi in slowly, stirring as you drop to ensure they don't stick together. When the gnocchi have cooked they will all start to pop up to the surface of your water. This doesn't take long. Once they have all risen, drain and rinse and add to your sauce and serve.

But be prepared to stand up several times and refill plates, because trust me - you and your guests will want more than one serving.


The Pectin Test

pectintest.jpg

Pectin fascinates me. Did you know that it is found in most fruit in varying degrees? Did you know that under ripe fruit have more pectin than ripe fruit?When I first started preserving and learning about pectin I wondered how this water soluble enzyme could make the difference between a jelly/jam that sets and one that does not.

So naturally when I began developing more of my own recipes I wanted to better understand pectin and how it impacts the preserves I was making. I wanted to know how to determine when you needed to add commercial pectin in order to achieve set and when you did not? 

pectin test pear

Who better to turn to when you want to learn something about preserving, but the Jamlady. I saw her alcohol test for pectin and decided I needed to give it a try.

pectin test pear

You start by cooking the fruit for at least 5 minutes. As it cooked I crushed it down, then strained it through a sieve and allowed it to cool. You then mix 1 tsp of the juice with 1 tsp of rubbing alcohol in a small jar with a lid. Give it a good shake and then pour it out onto a plate. If a solid mass forms, the pectin level is high.

Raspberry Jam formed a nice solid mass

Raspberry Jam formed a nice solid mass

With the formation of a solid mass during this test, you can use the rule of a cup of sugar to a cup of juice when developing your recipe and you won't need to add pectin.

Blueberries has a small amount of gelatin formed in the test

Blueberries has a small amount of gelatin formed in the test

And in the instance of the over ripe pears below where absolutely no gelatin formed during the test you can conclude that you will need to add pectin to your recipe in order to achieve set.

Happy experimenting!

Over ripe pear showed no gelatin

Over ripe pear showed no gelatin

Ruby Red Raspberry Red Pepper Jelly

Just before the holidays I did a sampling day at a fantastic Vegetarian Butcher Shop called Yam Chops. There are many reasons I really enjoy sampling in the stores that carry my product but one of them is because it gives me time to not only meet the customers who shop at the store but I get to watch them shop and see what they are most interested in.

This particular sampling day was extra interesting. I walked up to a couple who was obviously doing some Christmas shopping for their foodie friends and asked them if they would like to try some of my Apple Pie in a Jar. After a quick conversation and introductions, Karen told me that she had in fact emailed me just after hearing me on the cbc about a product that her sister brings with her from BC whenever she visits. Raspberry Pepper Jelly.

So with a free afternoon over the holidays I decided to experiment with the idea of Raspberries and Red Peppers and see what would come out of it. Karen...if you are reading this, this is for you!

raspberries

Raspberry Red Pepper Jelly

1/3 cup diced yellow banana pepper

1 1/3 cup diced sweet red pepper

2 cups frozen raspberries

1 3/4 cup cider vinegar

1 cup water

5 cups granulated sugar

1 - 3oz liquid pectin

Directions

In a medium sized pot over medium heat combine the peppers, raspberries, cider vinegar and water and bring to a boil. Reduce heat, cover and simmer for 20 minutes. Turn off the heat and let it sit for 5 minutes.

Using a tight weave strainer pour the liquid into a bowl catching the meat of the peppers and raspberries. For a nice clean jelly, take a piece of cheese cloth or a coffee filter and strain the liquid through several times.

Cover the liquid, refrigerate and allow to sit in your fridge over night. Strain once again in the morning, being careful not to disturb any sediment on the bottom of the bowl.

red pepper jelly

Pour the strained liquid into a medium sized pot over low heat and allow the liquid to warm. Once the liquid is warm to the touch, add the 5 cups of sugar and stir thoroughly. Once the sugar has dissolved fully increase the heat to medium. While stirring constantly bring to a full rolling boil. Add your liquid pectin and stir continually until it returns to a rolling boil. Time the boil for 1 minute and then turn off the heat. Skim any foam off the surface and ladle into previously sterilized jars.

Place jars in a waterbath for 10 minutes. Yields 4-5, 250ml jars

raspberry red pepper juice


Cleaning your Copper Jam Pot

copper jam pot

I love my copper jam pot for so many reasons. First off, it is gorgeous. Yes, that is right. I just called a pot gorgeous. Secondly, it conducts heat beautifully so it makes lovely jam full of flavour with a smooth consistency and lastly it is EASY to clean. No expensive special cleaners required.

Copper can get a beautiful patina, but I like the inside of my pot to be nice and fresh looking.

dirty copper jam pot

As you can see it had been a while since I had given my pot a proper cleaning so it was developing a patina along the edge. All you need is a slice of fresh lemon and a pinch of salt. Scrub the pot with the lemon and salt, adding more salt as required until the pot shines like new.

lemon and salt
clean copper jam pot


Three Heart Warming Christmas Preserves

It is not that I hate winter, I just don't particularly like it. The days are too short, the evenings too dark. But mostly, winter is just too cold. No matter what I wear, how many layers I put on, I step outside and instantly my shoulders are up round my ears, my jaw is clenched and I am angry. Angry because I spend 6 months of the year feeling cold.

But enough complaining, right? To combat the cold, I find I am drawn to rib sticking food like meat loafs, steak pies, lasagna, roasts. Gone are the Quinoa salads of summer.

The same is true with the preserves I am most drawn to making. Nutmeg and cinnamon come into rotation a lot more. Ginger and apples. Oh and lets not forget the warming effects of booze ;).

cranberries2.jpg

It is for this very reason that I am drawn to the following recipes that just sound perfect for the winter months and for holiday meals.

Christmas Cranberry Gin

Spiced Clementine Preserve

Sugared Plums

I hope if you try any of them that you will report back to me with whether they brought some warmth to your winter months.

Meaningful Gifts for Christmas

fall

Fall has always been a season that seems to pass in a blink of an eye. One minute I am picking tomatoes from my garden and the next the snow is flying. This year is no exception. Halloween just passed in a blur and we all know that Christmas will be here before half of us have even figured out what we are going to get our families and friends. Let the mad scramble begin.

This Christmas is a special one for me. Mostly because my mom is coming out from Alberta to spend it with my husband and I. As some of you may know, this was a pretty tough year for my mom. Triple by pass surgery and then shortly thereafter another surgery to remove an extremely large mass. The fact that she is getting stronger with each passing day and that this year, I will get to spend Christmas with her makes me extra thankful. 

For about seven years while I was growing up, my mom took in exchange students. One year it was Wakako Futakuchi from Japan and the next it was Claudia de Carvalho Pinto from Brazil. I never asked my mom why she did it, I just adjusted to a new presence in the home. I just accepted a new culture in my life. Over the years, I learnt a lot from these additions to our family and each year I waited anxiously to meet the new student who would spend a year with us. But not only did my mom accept exchange students into our home, we also always had a foster child. Letters and photos would arrive from Lasa thanking us for our families generosity and telling us about how he was progressing in school. I got to glimpse into the life of someone much less fortunate financially than I.

Perhaps that is why when I was asked to take a look at Gifts that Matter, it struck a chord. I was particularly drawn to the Mothers Matter page - for obvious reasons based on this year's events. Not only because of what my mom has gone through this year, but also because of everyone's generosity with our kickstarter campaign. We are building a rental kitchen here in Toronto, so how wonderful would it be to help fund a stove for a family in Ethiopia and have that be the kind of gift I give this season?

giftsthatmatter
fueleffecientstove

I encourage you to take a look at their site and see if maybe something within the pages strikes a chord with you. You just never know when or where inspiration will hit you.

Manning Canning and Yeeboo Digital are each donating a fuel-efficient stove for a family in Ethiopia and giving them away on our facebook page, so be sure to check it out. Who wouldn’t want to receive a Gift That Matters this holiday season?


How our Rental Kitchen means more GOOD FOOD for Toronto

Our kickstarter campaign is now 71% funded with 8 days to go. This is our 3rd story highlighting a Toronto food producer that would benefit from the use of the rental kitchen. Thanks again to Mark Cirillo for guest posting for us. For more information on Mark and the great work he does, click here

Manning Canning talks with the Founder and Chief Foodie of GOOD FOOD FOR GOOD.

Richa Gupta with Glen Peloso at Distinctive Appliances Showroom 

Richa Gupta with Glen Peloso at Distinctive Appliances Showroom 

When Richa Gupta made a career shift from Fashion to Food in 2010, she was hoping to find more satisfaction by pursuing her passion. “I grew up in a family where we cooked real food three times a day,” she says of her upbringing in Delhi, India. “It is a big part of the culture.”

But working in marketing at a large packaged food company, she often found herself at odds with the direction the industry was going.  “Industrialized food companies are looking for ways to make production cheaper and more efficient. They often use additives instead of real food, and preservatives to extend the shelf life. I found I was always pushing against this because I believe food is our natural fuel,” she says. 

good_food_for_good

So in 2013 she quit her full-time job to launch GOOD FOOD FOR GOOD, a social enterprise with a dual purpose: to make real food to people who can afford it, and donate a portion of the proceeds to provide healthy food for people who cannot. 

“Every purchase feeds a hungry child,” says Richa. “I chose to partner with Akshaya Patra in India because of their transparency. I know they provide real, healthy meals for the 1.4 million children they help every day,“ says Richa. 

Here in Toronto, GOOD FOOD FOR GOOD makes a line of Indian, Mexican and Mediterranean spreads and simmer sauces. All of their foods are additive and preservative free and use predominantly fresh, organic and local ingredients.

“My philosophy is to use the freshest ingredients possible,” says Richa. “Real food is supposed to go bad if it sits on a shelf for too long. Our sauces have an expiry date of about eight to ten weeks from when they’re made; spreads are a little over two weeks.” 

To work with such short production cycles requires close partnerships with suppliers like Samsara Fields in Waterford, Ontario, a grower of certified organic produce.

It also requires a lot of kitchen time, and without a reliable long-term solution in place, Richa and her team are struggling to meet demand for their products. In less than a year they have changed kitchen facilities three times. 

Having a dedicated commercial kitchen would save a lot of time and effort for the GOOD FOOD FOR GOOD team, energy that could be invested in growing the business. Richa also feels a shift from non-profit to private partnerships will help take her business to the next level.

“Until now community kitchens like Foodshare have worked well for us. But it’s hard to expand using that model, “she says. 

“Working with someone like Christine Manning, who has a vested interest in our success and firsthand entrepreneurial experience in our industry, would be very helpful.

“Manning Canning is more than just a resource, I think of it like a long-term strategic partnership.” 

To learn more about Good Food For Good, visit their website.

To learn about the Manning Canning Kickstarter campaign to build a commercial kitchen for the Toronto food community, click here.

Thanksgiving horseradish

grindrod

For the past few days I have been out in Beautiful British Columbia at my eldest sister's house spending time with my mom who is recovering from 2 back to back surgeries this year. We've been soaking up the amazing views that surround my sister's home and enjoying being surrounded by nature.

When my sister Monica suggested we spend part of the day making horseradish from the wild horseradish that grows in abundance on her property, you have to know that my answer was out of my mouth before she even finished asking the question. YES, YES, YES!

I couldn't think of a better way to spend thanksgiving than with my mom and my sister doing what I love to do most - preserving. It really was a magical day and it reminded me of the reasons I find preserving to be so rewarding and what made me fall in love with the process in the first place.

Spending the day digging in dirt, peeling, chopping and laughing with family. Working hard, but feeling such a tremendous feeling of accomplishment when you look at the finished product all lined up in jars. Knowing that throughout the winter when you crack that jar open you will remember the afternoon spent in the cool October air making memories with family.

Who knew that something that could burn your eyes and make you cry could also make you smile?

horseradish

Our first step was simple...we walked out into their alfalfa field and dug up the wild horseradish that grows there. I couldn't believe how much of it was there and wish that I had an empty suitcase with me to bring some of this stuff home.

Once it was all collected, we laid it out on the grass and sprayed the dirt off of it to help make it easier to peel.

With three people on the job, peeling it was easy. My sister used a carrot peeler, but to get the job done quickly, I chose to assist with a spoon. I found it peeled just like ginger with a spoon.

peeled_horseradish

Then we cubed the peeled ginger and measured it out according to the recipe. Now, I have never made horseradish before, so for our recipe, we turned to the experts at Canadian Living.

The best part about the whole experience and the part that really put me in touch with my Italian heritage was the gas stove in the garage that my sister has hooked up to a propane tank. Made me wish we were spending the day with the garage door open making tomato sauce!

Italiankitchen

I hope you all had a wonderful Thanksgiving and did something you LOVE!

A Milestone for the Toronto Food Community

We are 51% funded on our kickstarter campaign with 15 days remaining. As you know, our goal is to build a much needed rentable commercial kitchen space in Toronto to help food producers bring their amazing products to the market. This is our 2nd story highlighting a Toronto food producer that would benefit from a space like this and their challenges to date. Thanks to Mark Cirillo for taking the time to interview Stewart and for writing the great post below. For more information on Mark, click here.

crownandanchor

Crown and Anchor’s Stewart Robertson says the Toronto local food scene is overdue for a dedicated commercial kitchen.

“I’ve talked to a lot of chefs who say they don’t want the hassle of renting out their kitchens,” says Stewart Robertson. “And I really don’t blame them.”

“It’s not just a lot of trouble for the money, there’s also trepidation. If they’re serving vegan, glutton-free or nut-free foods there’s a real risk of contamination if someone comes into your kitchen and doesn’t use or clean it up properly.”

As the owner of Crown and Anchor Food, makers of traditional sausages and sauces, Stewart understands the problem firsthand.

“When you’re grinding meat for sausages you have to be very careful about the spread of bacteria,” he says. “The Toronto Board of Health has very specific guidelines about how to do it.”

In practice that means the already small pool of available commercial kitchens in the city is even smaller for meat producers like Stewart.

“It’s kind of sad in the fourth largest city in North America that there are so many people producing food but it’s so hard to get kitchen time.”

Crown and Anchor makes a range of handmade sausages: German Bratwurst, North African Merguez, Mexican Chorizo, Cajun Andoille, Italian Barese, English Breakfast. They also make organic mustards, and plan to launch a line of barbeque sauces in the near future.

“Right now I’m focused on supplying restaurants but I expect we’ll be in some retail stores in Toronto by next year,” says Stewart.  

But to continue to grow he needs to find a more scalable production model. Pretty soon, hauling over one hundred pounds of meat and equipment across the city to make small batches of sausages during off-hours just won’t cut it.

That’s why he’s looking forward to the Manning Canning Commercial Kitchen, a resource he feels is overdue in this city.

“The local food community is a growing scene in Toronto. We need something that’s dedicated to small batch artisanal products, where you don’t feel like second banana and you’re confident they’re going to be around for a long time,” he says. 

He feels the new facility is a milestone for the city that will most likely pave the way for others in the future, as demand for commercial kitchen space continues to increase.

In Stewart’s own case, simply having sufficient storage and refrigeration in one place will be a huge benefit. But he’s also looking forward to sharing a physical space with other small producers and expects it will act as an incubator for new projects in the years to come.

“The local food community is pretty amazing. I’ve only been involved a short time but I’ve met so many people who have been willing to lend me a hand,” he says.

“Honestly, you really don’t know how great it is till you get involved.”  

To learn more about Crown and Anchor Foods, visit crownandanchorfood.ca

 To learn about the Manning Canning Kickstarter campaign to build a commercial kitchen for the Toronto food community, click here.